


 | -> |  | -> |  | -> |  | -> |  |
| 16:9 | 1.85:1 | 2.35:1 | 4:3 | 1:1 |
On AVI-Files there is an automatic detection of the correct aspect ratio.
On all other Videofiles you have to press the AR-Key that often until you reach the correct aspect ratio for the file.
Download: MediaAspect V1.3 (07.12.2009) 

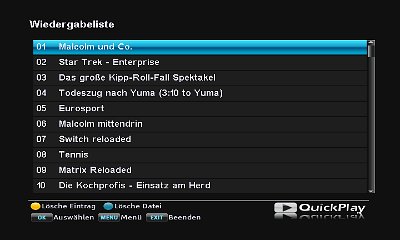
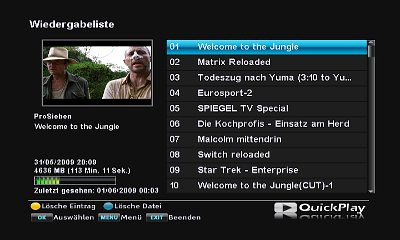
With QuickPlay you can restart the last watched file with just on key press or open a list of the last (max. 50) played files
for an easy restart.
Also QuickPlay can pause playback of Recordings, which normally can't be paused by the receiver itself and allows you
to delete running playbacks directly without accessing the file list.
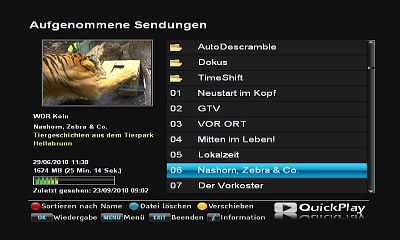
It also supports a simple Filemanager which can be accessed from the QuickPlay-View by
the >> key or the << key (like in the original filemanager).
This filemanager supports a moving feature for files with automatically renaming (if file with same name still exists in the target folder).
To move a file, mark it with the yellow key, point the cursor on the target folder and press the yellow key again.
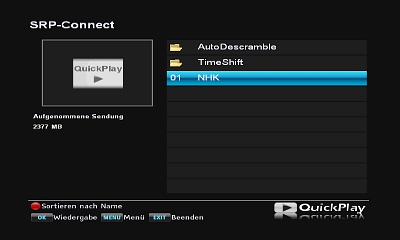
QuickPlay gives you access to the recordings of a second SRP, if QuickPlay is also installed on the second SRP. To connect the SRPs you have to enter the SRP-Connect.ini within the Settings-Folder.
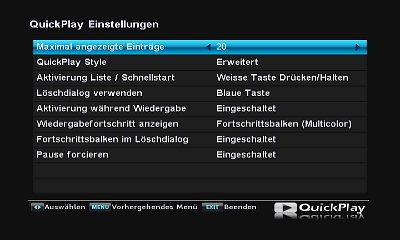
QuickPlay can be activated with the white key and provides a lot of options for changing it's OSD and behaviour.
To make use of the feature SRP-Connect, you have to edit the SRP-Connect.ini within the Settingsfolder of QuickPlay.
It contains two line:
IP-Address
Buffer in MB
TFIR IP-Address
TFIR Remotecode
Within the line "IP-Address" enter the IP-Address of you other SRP (e.g. IP-Address=192.168.2.1).
In the line "Buffer in MB" enter, how many MB should be buffered before local playback starts (e.g. Buffer in MB=50).
In the line "TFIR IP-Address" you can enter the IP-Address of a TFIR, if you use one (e.g. TFIR IP-Address=192.168.2.2).
In the line "TFIR Remotecode" you have to enter the Remotecode for the TFIR, if you use one (e.g. TFIR Remotecode=5).
 | 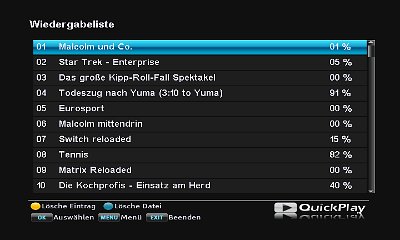 |
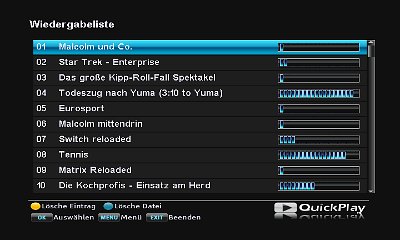
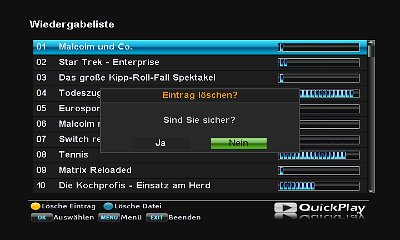
| List (simple) | List (with progress in percent) |
 |  |
| List (with progress as bar) | List (with delete dialog) |
 |  |
| Extended view with multicolor progressbar | Filemanager for Recordings, Mediafiles and MP3 |
 |  |
| Delete dialog during playback | Forced Pause on cutted/scrambled file |
 |  |
| Connection to another SRP | QuickPlay Menu |
Download: QuickPlay V4.94 (24.01.2013)
Bugfixes / New Features:
- UTF8-Support
- Wrong selected parent folder on alphabetic order fixed

QStart can resume the last playback and delete a file while playing it.
If the archive button is pressed within the delete dialog, the file is deleted (whether Yes or No is selected) and then the archive is displayed.
By default the white button resumes playback and the blue button displays the delete dialog.
These settings can be changed in the qs.ini in ProgramFiles/Settings/QStart.
Download: QStart V1.2 (11.11.2013)

 ) the volume can be reduced by pressing the Mute-Key. If you press the mute key again within a second, the sound will be muted completely.
If you press the Mute-Key again after more than a second, the volume will rise until the prevoius volume level is reached.
If the Mute-Key will be pressed while the volume is rising, the volume will stop rising immediately.
To reach the Menu of Liza, press the Mute-Key twice ("Mute" will be displayed) and than press the Menu-Key within the next three seconds.. Within the menu you can change how much the volume will be reduced by Liza and if the Volume bar will be displayed continously if the volume is reduced by Liza.
 ->
->  ->
->  ->
-> 
Download: Liza V1.6 (21.02.2013)

SwitchBack also takes care that a recordings of scrambled channels will made descrambled if possible.
 | If the receiver changes the channel to start a recording, you will get a message window about the upcoming change of the channel. As soon as the channel was changed, SwitchBack tries to switch back to the previous channel. REMARK: In some cases it is impossible to switch back to the prevoius channel. In these cases, an error message is not generated. The TAP activates itself by the first interaction (key event) of the user and stays inactive during recordings in absence. If the receiver starts for a timer of a scrambled channel, SwitchBack changes Tuner and channel that the recording will be done descrambled. This feature does not work if Tuner 4 is used for the timer. |
Download: SwitchBack V1.21 (18.11.2010)
ATTENTION: This TAP was replaced by IQTuner. Do not use both TAPs together!

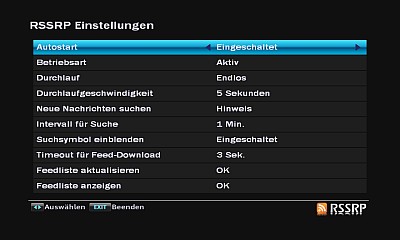
Installation instruction: Copy RSSRP.tap and wget into ProgramFiles Folder and start the TAP manually. The TAP itself can be placed also in the AutoStart Folder, but in this case you have to disable the AutoStart within the Menu of the TAP.
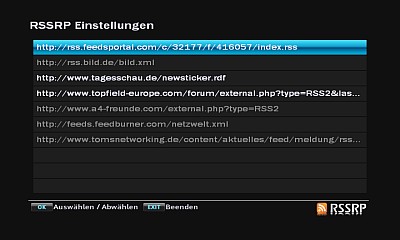
After starting the TAPs, it creates a file feed.lst in ProgramFiles/Settings/RSSRP. Within this file you will find the links to the feeds. If this file is missing, it will be created with a default feed.
This file can be edited on the PC and reloaded within the TAPs menu. It is only allowed to enter one feed per line and max. 10 feeds.
The type of the feeds has to be XML! Different kind of feeds can't be used.
 |  |
| News-Ticker | Ticker and complete News |
 |  |
| Menu | Feedlist |
Usage:
Subtitle: Activation of the TAP, if it is hidden or inactive
Menu: Open the TAP Menu
i: Displays the complete News
Right: Next News
Left: Previous News
>|: Next Feed
|<: Previous Feed
Down: Next page of News
Up: Previous page of News
OK: Next page of News (endless)
Exit: Hides News / Ticker
Download: RSSRP V1.14 (15.09.2010)
New Features / Changes:
- Replacement for some special characters added

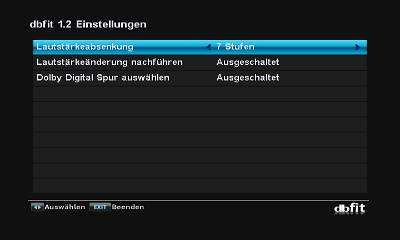 | Dolby Digital tracks are normally less loud than MPEG tracks, which makes it neccessary to correct the volume manually. This correction is done by dbfit automatically. To automate this, a fixed reduction of the volume for MPEG or Dolby Digital Streams can be selected. Also it is possible to have a individual reduction for some channels. The TAP Menu can accessed by pressing the Menu-Key while the Audio Menu (Key with Questionmark) is displayed. |
Download: dbfit V2.92 (03.04.2012)
Bugfix:
- Possible reboot in undefined playback situation

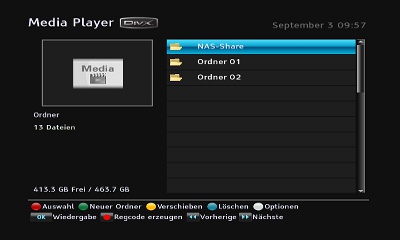 | It will mount up to four directories (one for Videos, one for Pictures, one for MP3 and one for Recording) from the NAS to the local Folders on the SRP.
To mount your NAS onto the SRP, you have to edit the file NASMount.ini which is located at ProgramFiles/Settings/NASMount. |
The NASMount.ini contains the following lines:
NAS IP-Address
Here you have to enter the IP-Address of the NAS-Server.
NAS MAC-Address
If you enter the MAC-Address of the NAS-Server, a continously WOL-Command will be send to the Server.
Local Folder Name
Name for the local folder where the files will be mounted to.
This folder will be deleted automatically after shutting down the receiver.
Remotefolder MediaFiles
Path to the Mediafiles on the NAS-Server.
Leave this entry empty if there is no kind of folder on the NAS-Server.
Remotefolder MP3Files
Path to the MP3-Files on the NAS-Server.
Leave this entry empty if there is no kind of folder on the NAS-Server.
Remotefolder PhotoFiles
Path to the Photosfiles on the NAS-Server.
Leave this entry empty if there is no kind of folder on the NAS-Server.
Remotefolder DataFiles
Path to the Recordings on the NAS-Server.
Leave this entry empty if there is no kind of folder on the NAS-Server.
Mountoptions
Here you can enter additional mount options, which are used for all mount points.
Leave this entry empty if you didn't need any additional mount options.
NAS Boottime [0-600 seconds]
On Automount=1 you can define how long the TAP will wait after a successful PING, before it mounts
the Server.
On Automount=0 you can define the time the NAS needs to wake up after the first WOL Command.
Automount [0=OFF / 1=ON]
Performs an automatic Mount / Unmount if the NAS server is online / offline.
If Automount=0 is set, it will try to mount the NAS without checking if it is online and
unmount it only if the TAP is stopped.
PingWait [3-10 seconds]
Time in seconds how long the TAP is waiting for an answer of the PING command.
PingGap [30-300 seconds]
Gap in seconds between the PING commands.
NAS Recording [0=OFF / 1=ON]
Mounts the DataFiles-Folder of the first NAS as Recordingdevice
MountDelay [0-600 seconds]
Seconds the TAP waits before it tries first time to mount the NAS or send the WOL.
If the value is 0, NASMount checks the online status of the Receiver by itself and starts the mounting/WOL as soon as the connection is established.
Timerdelay [0=OFF / 1=ON]
Delay for timers, starting within on minute after start of the TAP.
Only active, if also NAS Recording is enabled.
Silentmode [0=OFF / 1=ON]
Hides the Mount/Unmount Icon of NASMount.
Logfile [0=OFF / 1=ON]
Writes a logfile.
Example.:
NAS IP-Address=192.168.2.200
NAS MAC-Address=FA:7C:CB:16:77:A0
Local Folder Name=NAS-Share
Remotefolder MediaFiles=/mnt/Files/MediaFiles
Remotefolder MP3Files=/mnt/Files/MP3Files
Remotefolder PhotoFiles=/mnt/Files/PhotoFiles
Remotefolder DataFiles=/mnt/Files/DataFiles
Mountoptions=-osoft,intr,tcp,rsize=65535,nolock
NAS Boottime=60
Automount=1
Ping Wait=3
Ping Gap=30
NAS Recording=0
MountDelay=0
Timerdelay=0
SilentMode=0
Logfile=0
In total you can mount up to ten NAS-Servers.
For each additional NAS-Server you have to make new INIs (2.ini until 10.ini).
They have same entries like the NASMount.ini, except of:
NAS Recording
Timerdelay
MountDelay
SilentMode
Logfile
The TAP can be placed within the AutoStart Folder and checks automatically if the Server is online.
As soon as the Server is available, a logo with the number of mounted devices will be displayed.
If the Server is not available within two minutes after starting the TAP, you will also see a Logo about the status and the TAP will stop trying any longer to access the Server.
Download: NASMount V3.1 (09.01.2015)

On first start of the TAP an INI-File will be stored in ProgramFiles/Settings/WOL/WOL.ini.
This file has to be copied to the PC, edited and copied back to the Receiver.
The content of the INI File is like that:
MAC-Address=FF:FF:FF:FF:FF:FF
Resend x times=3
Repeat in seconds=300
MAC-Address -> Here you have to enter the MAC-Adresse of the Computer, which should be started by WOL Command.
Resend x times -> Here you have to enter, how often the command should be repeated.
Repeat in seconds -> Here you have to enter, after how many seconds the command will repeated
Above displayed INI would send the WOL Command three times every 300 seconds to the MAC-Address FF:FF:FF:FF:FF:FF.
IMPORTANT: Additional to the TAP itself, the file busybox has to be copied into the folder ProgramFiles.
The TAP can be stored within the Autostart and will send the first WOL Command 20 seconds after the receiver has booted.
Download: WOL V2.0 (24.11.2010)

 | This TAP changes all Timer to prevent (as far as possible) changing the live channel if a recording starts.
Additionally it makes sure (as far as possible) that recordings of scrambled channels during absence are performed descrambled.
It supports all Receivers of the SRP-Series, independend if the Receiver supports 2 or 4 recordings. All Settings can be changed with the Setup TAP. |
If you set the recording device to internal, you can modify the name of the Timer to record to an external harddisk.
Just add (EXT) before the name of the Timer.
Example for a Timername, which will be recorded to the external harddisk:
(EXT)Weeds
To generate a logfile, you have to create a folder "Logs" within Settings/IQTuner.
ATTENTION!
The file FirmwareTMS.dat has to be stored within the Folder ProgramFiles, if it doesn't still exist in this folder or only within an outdated version!
Download: IQTuner 4.3 Autoinstaller (25.02.2013)
Changes / New Features:
- Temporarely change of live channel and forced descrambling interrupts and continues playback
- Conflict check for recordings only performed for manually started recordings

 | The time for shutting down has to be defined within the ShutDown.ini with an editor. The INI is located in the folder Settings/ShutDown and contains the following lines:
ShutDown Hour=[Hour] |
With "ShutDown Hour" and "ShutDown Minute" you can set the time for shutting down the receiver.
You can set up three different times for shutting down the receiver.
On unused times you have to enter -1 as value for Shutdown Hour and Minute.
With "ShutDown after Minutes" you can set the time in minutes to shutdown the receiver on inactivity.
With "ShutDown Mode" you can set the mode, in which the receiver will be shutted down after x minutes of inactivity.
If you set ShutDown after Minutes=0, the receiver will stay on also on inactivity.
Example:
ShutDown Hour=6
ShutDown Minute=15
ShutDown Hour 1=8
ShutDown Minute 1=30
ShutDown Hour 2=-1
ShutDown Minute 2=-1
ShutDown after Minutes=180
ShutDown Mode=0
With this INI the Receiver would shutdown at 06:15 o'clock and 08:30 o'clock, accordingly after 180 Minutes of inactivity.
Before the Receiver will be shutted down, a dialog will be displayed, which allows you to cancel the shutdown process.
Download: ShutDown V1.3 (02.04.2012)

Some devices of the current HDPVR-Series resets the VFormat after each reboot back to 1080i.
This TAP can set another VFormat after booting the receiver.
This TAP has to be stored in AutoStart Folder of the Receiver.
Storing the current Format:
1. Make sure that your receiver is at least one minute in operation mode.
2. Chose the desired VFormat on the Receiver.
3. Start the TAP manually.
A short message will be displayed that the current VFormat was saved and the TAP will stop itself.
On next start of the Receiver, the TAP will restore the previous selected VFormat and will stop itself.
Download: VFormat V1.1 (21.10.2011)

The TAP can be placed within the AutoStart Folder or started manually on demand. It does not give any feedback and runs completely in background.
Unknown file types within the Incoming Folder will be deleted automatically by iMover. If a file with same name still exist in the target folder, the new file will be renamed.
Download: iMover V1.0 (14.11.2011)

 | With the number keys 1-3 you can chose the level, with OK you can start the game.
Level 1: Sequence of 10 colors The device has four colored buttons, each producing a particular tone when it is pressed or activated by the device. A round in the game consists of the device lighting up one or more buttons in a random order, after which the player must reproduce that order by pressing the buttons. As the game progresses, the number of buttons to be pressed increases. |
Download: Colors V1.3 (24.04.2012)
